Authentication System
This guide explains how to use the user authentication system of IntelliAsk, which offers secure and easy email and social logins. You will learn how to set up sign up, log in, password reset, and more.
General
For a quick overview, refer to the user guide provided here: Authentication
Here's an overview of the general configuration.
| Key | Type | Description | Example |
|---|---|---|---|
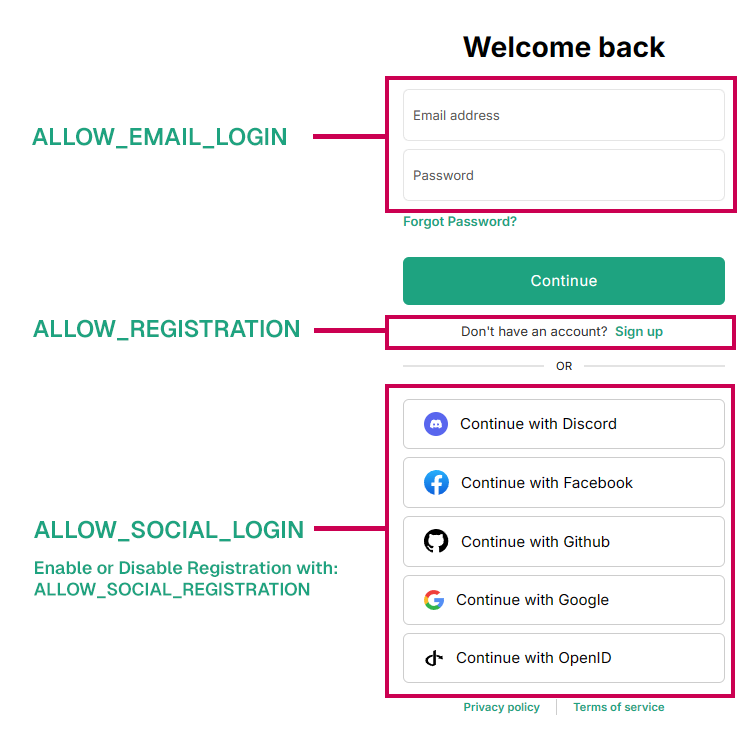
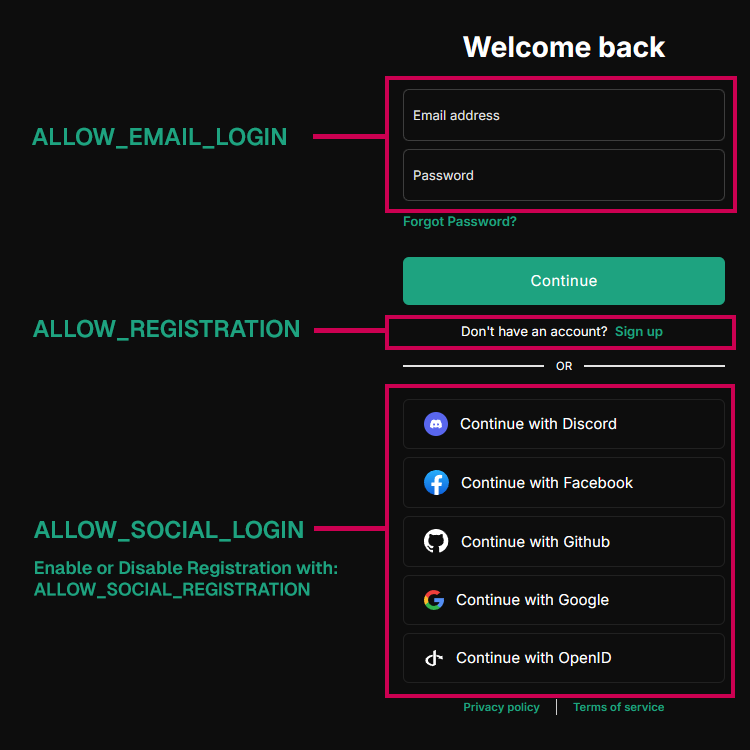
| ALLOW_EMAIL_LOGIN | boolean | Enable or disable ONLY email login. | ALLOW_EMAIL_LOGIN=true |
| ALLOW_REGISTRATION | boolean | Enable or disable Email registration of new users. | ALLOW_REGISTRATION=true |
| ALLOW_SOCIAL_LOGIN | boolean | Allow users to connect to IntelliAsk with various social networks. | ALLOW_SOCIAL_LOGIN=false |
| ALLOW_SOCIAL_REGISTRATION | boolean | Enable or disable registration of new users using various social networks. | ALLOW_SOCIAL_REGISTRATION=false |
Note: OpenID and SAML do not support the ability to disable only registration.
Quick Tips:
- Even with registration disabled, you can add users directly to the database using the create-user script detailed below.
- To delete a user, you can use the delete-user script also detailed below.
Session Expiry and Refresh Token
- Default values: session expiry: 15 minutes, refresh token expiry: 7 days
| Key | Type | Description | Example |
|---|---|---|---|
| SESSION_EXPIRY | integer (milliseconds) | Session expiry time. | SESSION_EXPIRY=1000 * 60 * 15 |
| REFRESH_TOKEN_EXPIRY | integer (milliseconds) | Refresh token expiry time. | REFRESH_TOKEN_EXPIRY=(1000 * 60 * 60 * 24) * 7 |
JWT Secret and Refresh Secret
- You should use new secure values. The examples given are 32-byte keys (64 characters in hex).
- Use this tool to generate some quickly: JWT Keys
| Key | Type | Description | Example |
|---|---|---|---|
| JWT_SECRET | string (hex) | JWT secret key. | JWT_SECRET=16f8c0ef4a5d391b26034086c628469d3f9f497f08163ab9b40137092f2909ef |
| JWT_REFRESH_SECRET | string (hex) | JWT refresh secret key. | JWT_REFRESH_SECRET=eaa5191f2914e30b9387fd84e254e4ba6fc51b4654968a9b0803b456a54b8418 |
Automated Moderation System (optional)
The Automated Moderation System is enabled by default. It uses a scoring mechanism to track user violations. As users commit actions like excessive logins, registrations, or messaging, they accumulate violation scores. Upon reaching a set threshold, the user and their IP are temporarily banned. This system ensures platform security by monitoring and penalizing rapid or suspicious activities.
To set up the mod system, review the setup guide.
Please Note: If you want this to work in development mode, you will need to create a file called
.env.developmentin the root directory and setDOMAIN_CLIENTtohttp://localhost:3090or whatever port is provided by vite when runnningnpm run frontend-dev
User Management Scripts
IntelliAsk ships a set of Node scripts for managing users directly, which is useful when registration is disabled or you need to administer accounts from the server. Run them inside the intelliask container.
Use the intelliask binary's shell command to run a script in the container:
Available Scripts
| Key | Type | Description | Example |
|---|---|---|---|
| create-user | — | Add a new user directly to the database (works even when registration is disabled). | npm run create-user |
| invite-user | Send an invitation for a user to register. | npm run invite-user email@domain.com | |
| list-users | — | List all users in the database. | npm run list-users |
| reset-password | Reset a user's password. | npm run reset-password email@domain.com | |
| ban-user | Ban a user account. | npm run ban-user email@domain.com | |
| delete-user | Delete a user account. | npm run delete-user email@domain.com | |
| user-stats | — | Show user statistics. | npm run user-stats |
Create a User
Adds a user directly to the database, even when registration is disabled. Follow the prompts to enter the new user's email and password:
Delete a User
Removes a user account. Replace email@domain.com with the email of the user you want to delete:
Local development: If you're running IntelliAsk from source instead of the containerized stack, run these scripts from the project root without the container prefix, e.g.
npm run create-user.
Last updated on